By Aangan Editorial · Published 21 October 2026
Learn to read farmhouse drawings using Garden Weekender P01.1: check the revision, distinguish room and footprint areas, read openings and trace everyday routes.
Check the sheet, revision and units first
Start with the drawing title and revision before interpreting the rooms. In our seven-sheet Garden Weekender review package, A02 is the ground floor plan and P01.1 is the current concept revision. The site arrangement, elevations, section and opening schedule answer different questions. A floor plan on its own does not describe the complete building.
The PDF floor sheet states a scale of 1:75 at A3. This means a 4.60 m dimension corresponds to about 61.3 mm on a correctly sized print. Browser zoom, screenshots and “fit to page” printing change what you measure on screen or paper. Use the written dimensions and confirm the print settings rather than estimating a room by eye.
Check the units on each view. The review PDF states dimensions in metres unless noted; the interactive connected-plan view uses millimetres for drawing dimensions. A label of 4,600 mm and a label of 4.60 m describe the same length. Do not carry a number between views without its unit.

Separate clear room area, footprint and plot area
Bedroom 1 measures 4.60 × 4.60 m between its room faces, so its clear floor area is 21.16 m². Its attached bathroom and dressing room have their own dimensions and are not included in that bedroom figure. Multiplying the whole suite’s outer outline would answer a different question.
The house’s enclosed footprint is 14 × 12 m, or 168 m². The clear-room schedule totals 149.16 m²; the remaining 18.84 m² is identified in this concept as walls and thresholds. The fictional 30 × 45 m plot is 1,350 m². Plot area, house footprint and clear room area are therefore different quantities.
Keep their labels attached when comparing concepts or briefing a designer. These figures describe this drawing set. They are not a valuation, a statutory carpet-area declaration or a general rule for calculating a real project’s permitted coverage. Our comparison guide keeps plot area and enclosed footprint in separate rows.
Read doors and windows with their schedule
On A02, the terracotta door arc indicates the proposed leaf movement; the opening ID links it to the schedule. D02 is the nominal 0.90 m bedroom entry. D04 is the nominal 0.80 m opening to Bath 1. Those labels describe modelled openings, not a verified unobstructed clear width after frames, hardware and the final door assembly are installed.
The blue window marks also have IDs. W01 is a 1.80 m bedroom window, with a 0.90 m sill and a 1.20 m opening height in the schedule. Width alone does not tell you whether the view is private, the room has adequate ventilation or the window can be cleaned safely. Read the elevation and discuss the actual site conditions.
Symbols vary between drawings, so use the sheet’s legend. The simplified room-study diagrams use opening markers without door arcs; the complete floor sheet is the reference for the proposed swings. The primary-bedroom story connects those openings to the bed, bathroom and dressing area.
Trace movement with furniture and fittings in place
Follow three ordinary journeys: arrival to the living room, bedroom to bathroom, and kitchen to utility. Then add a less tidy moment, such as carrying a tray, pulling out a chair or opening a cupboard. A line between rooms can look connected while the usable route is obstructed by a fitting.
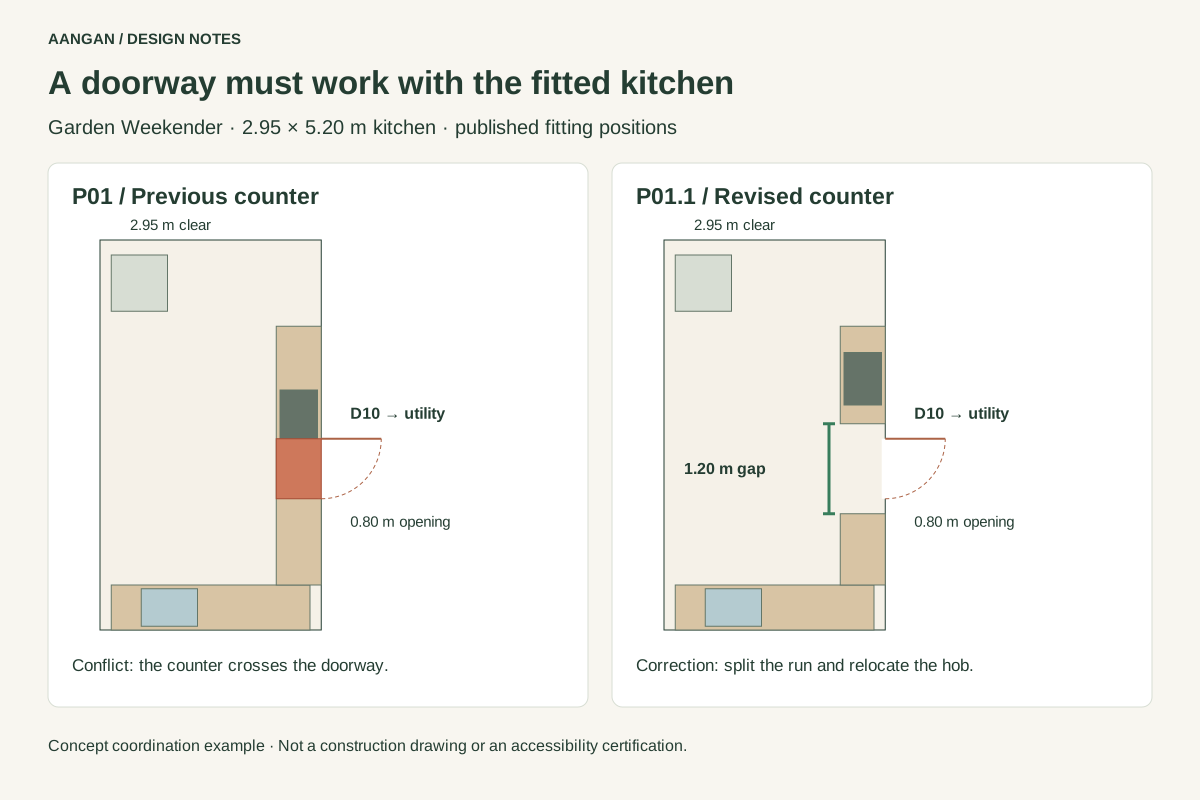
Our kitchen review found a continuous counter crossing the utility doorway. P01.1 splits that run into two segments and moves the hob onto the shorter run. The resulting gap between counter segments is 1.20 m around the nominal 0.80 m D10 opening. This is a specific coordination correction, not an accessibility certification.
Inspect the corrected kitchen drawing and walkthrough. The same principle applies to a wardrobe behind a door or a dining chair in a main route: check the objects in use, and record the remaining requirements for the actual users.
Read the package together and record open questions
Use the site sheet to locate the house, arrival and outdoor allocations. Use the floor plan for room relationships and openings. Use elevations for outside faces and opening positions, the section for proposed levels and vertical relationships, and the schedule to identify openings. Check that the sheet references and revision information agree.
For this concept, the 1.50 m hall, separate bathrooms and utility route can be explored, but the actual site, engineering, services and approvals remain unverified. The rendering adds illustrative finishes and styling; it does not replace those checks. Ask which drawings and responsibilities are needed for the next stage rather than treating a detailed-looking image as a finished design.
Download the review worksheet. For every issue, record the sheet or room, the observed fact, your question, who should resolve it and the agreed next step. Keep unanswered items visible when comparing plans or creating a private Garden Weekender variant.